Red Velvet Cheesecake
Red Velvet Cheesecake is a heavenly cheesecake! It’s rich, decadent, and oh, so chocolaty. This Red Velvet Cheesecake is explosive with a deep, red crimson color, a beautiful, elegant presentation, and on top of that this recipe makes 20 servings! It’s great for holiday parties, Valentine’s Day, or special occasions like anniversaries or birthdays.
Follow Me On Instagram!
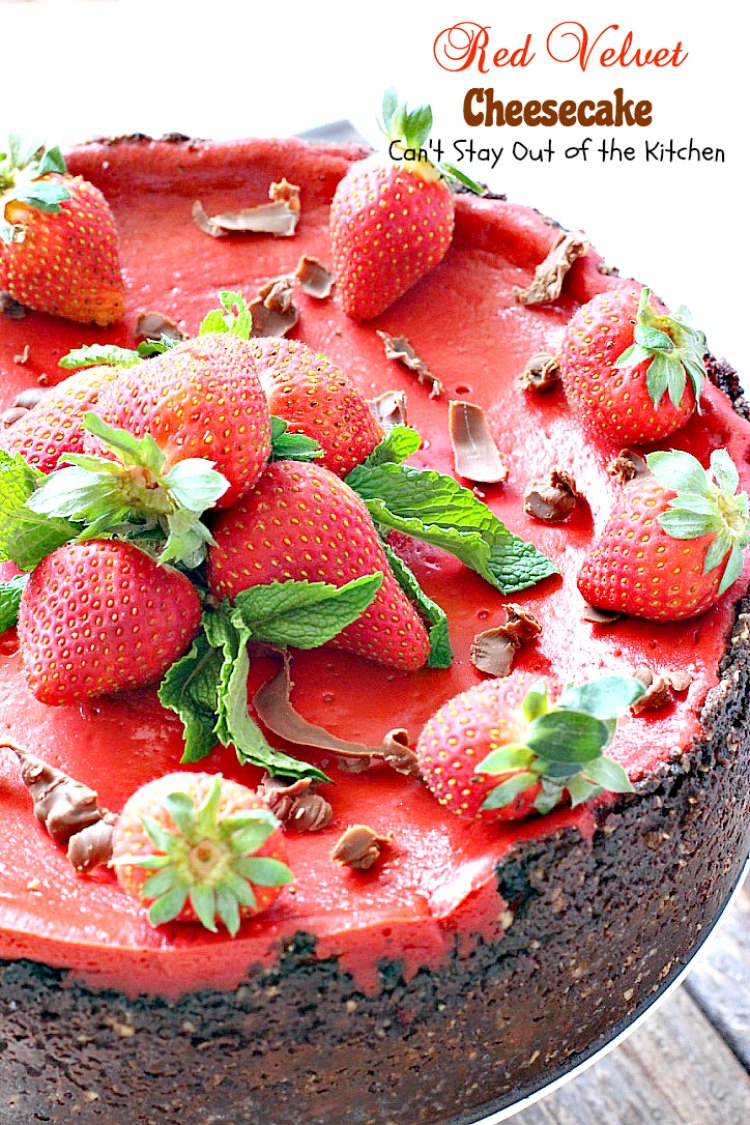
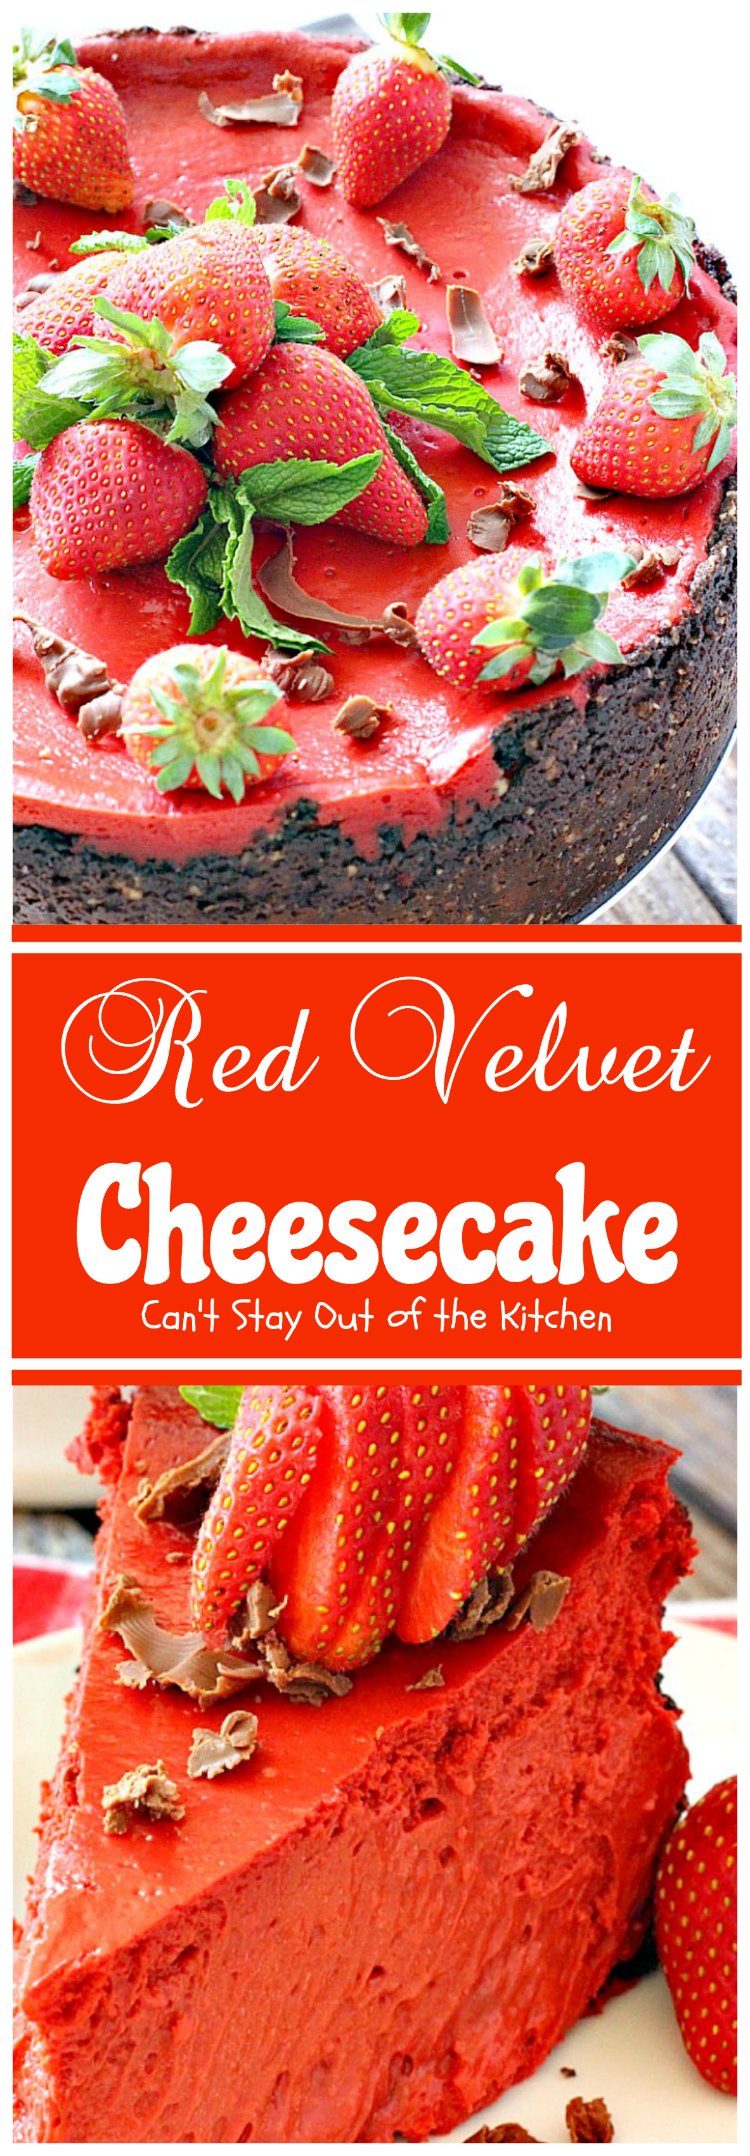
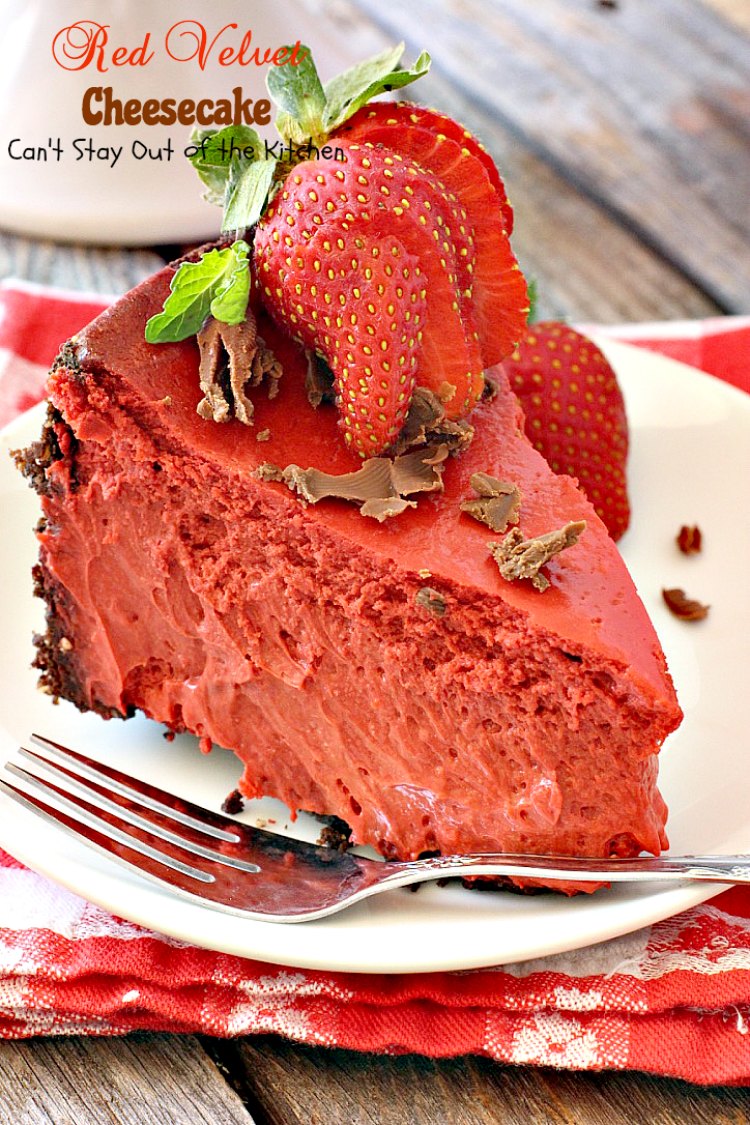
Everyone loves cheesecake and here’s a spectacular version just in time for Valentine’s Day. It has a luscious cookie crust made from Oreos (minus the cream filling), almonds, and chocolate chips. The cream cheese filling includes a heap of semi-sweet chocolate. I topped it with chocolate curls and strawberries. What’s not to love?
I saw this recipe in our local Christmas flyer for H-E-B grocery stores in Texas in 2011. Several of their vendors had provided recipes and this luscious looking cheesecake was inspired from one by Chobani Kitchens. I wanted to make this in 2011 but I had carpal tunnel surgery in both hands that November so I wasn’t able to do much baking beyond Thanksgiving until after the holidays.
It’s been over a year since I’ve wanted to bake this fantastic-looking recipe. I dedicate this recipe to my daughter-in-law, Candice, who loves Red Velvet Cake and Red Velvet desserts. I was hoping to make it for her during our family vacation together in July but it just didn’t work out. So here’s her virtual Red Velvet Cheesecake! I hope you, along with her, will enjoy this tremendous recipe.
The crust is spectacular even though it is quite involved. The crust calls for chocolate wafer cookies which I couldn’t find anywhere so I bought Oreos and scraped off the cream filling. These cookie crumbs without the cream filling made a great crust when all the other ingredients were added to them.
The second time I made this recipe I changed it up significantly from the original version. I added additional sugar, substituted heavy whipping cream for the buttermilk and used sour cream instead of Greek yogurt. I found the cheesecake better tasting and had a better texture than the original version.
If you’re looking for a delicious Valentine’s Day dessert or a scrumptious cheesecake dessert for any other special occasion, consider this Red Velvet Cheesecake recipe as a great option. It does take a good bit of time to prepare, but it’s worth it. Bon Appetit!
When I initially posted this recipe in January 2013, my pictures were okay, but they were taken with an iPhone so they were not as clear as I would have liked. I recently remade this recipe (February 2017) for our Super Bowl party along with Mississippi Mud Pie, Loaded Baked Potato Soup and a Secret Chili Recipe. Everything turned out well, but I have to admit the cheesecake was excellent. I do have one recommendation, however. This cheesecake needs to bake about 1 1/2 hours to be done enough to take out of the oven. It may still be a little jiggly in the middle but it will taste fine once it’s cooled and refrigerated.
While this dessert is a little more high maintenance than some desserts, it’s so worth it. Every bite will have you drooling. No kidding. Red Velvet Cheesecake is such a superb dessert for Valentine’s Day. I hope you give it a try.
Red Velvet Cheesecake is scrumptious!
This rich, decadent cheesecake has amazing flavor.
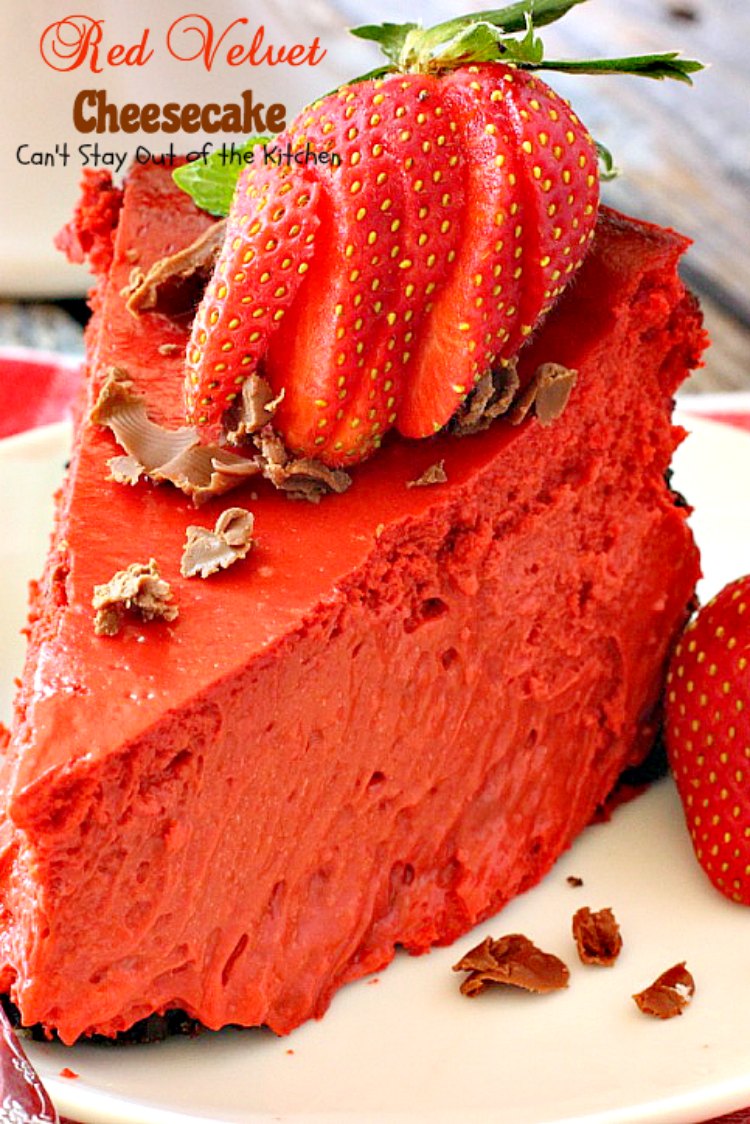
The crust is made with Oreos, chocolate chips, and almonds. The filling includes melted milk chocolate bars, eggs, heavy whipping cream, sour cream, cream cheese and red food coloring.
This is a fantastic dessert. Red Velvet Cheesecake will certainly WOW your guests!
Here’s what I did.
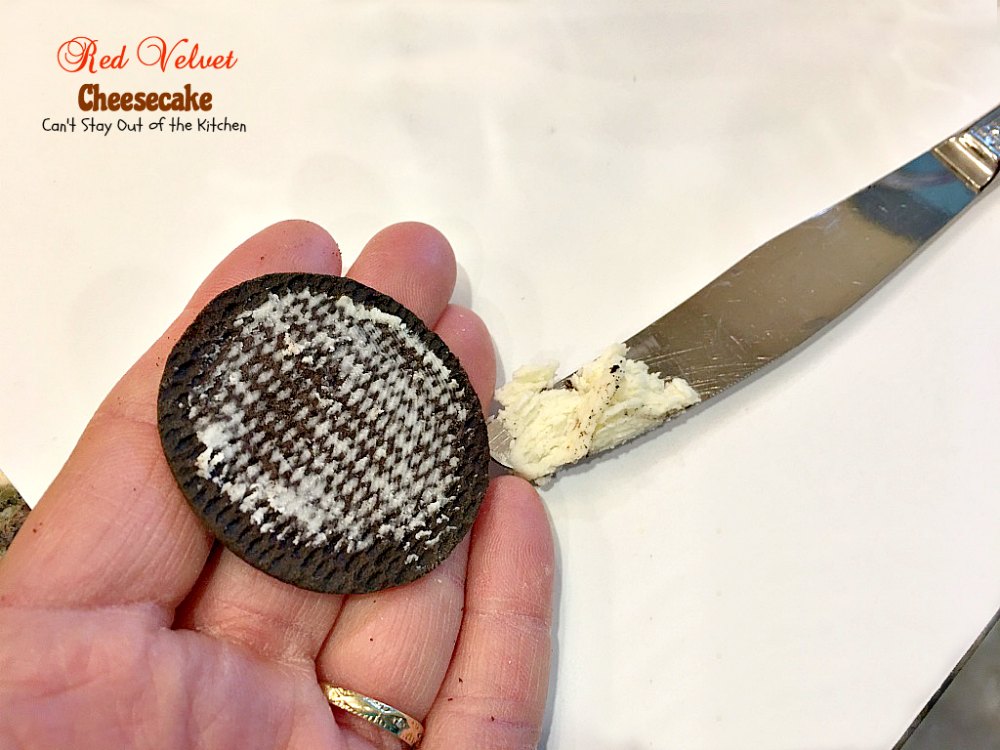
To make the crust: Scrape off the cream filling in your Oreo cookies and discard.
Place Oreos (without the cream filling), chopped almonds, chocolate chips and brown sugar in a food processor. (I used my Vitamix). Process until smooth.
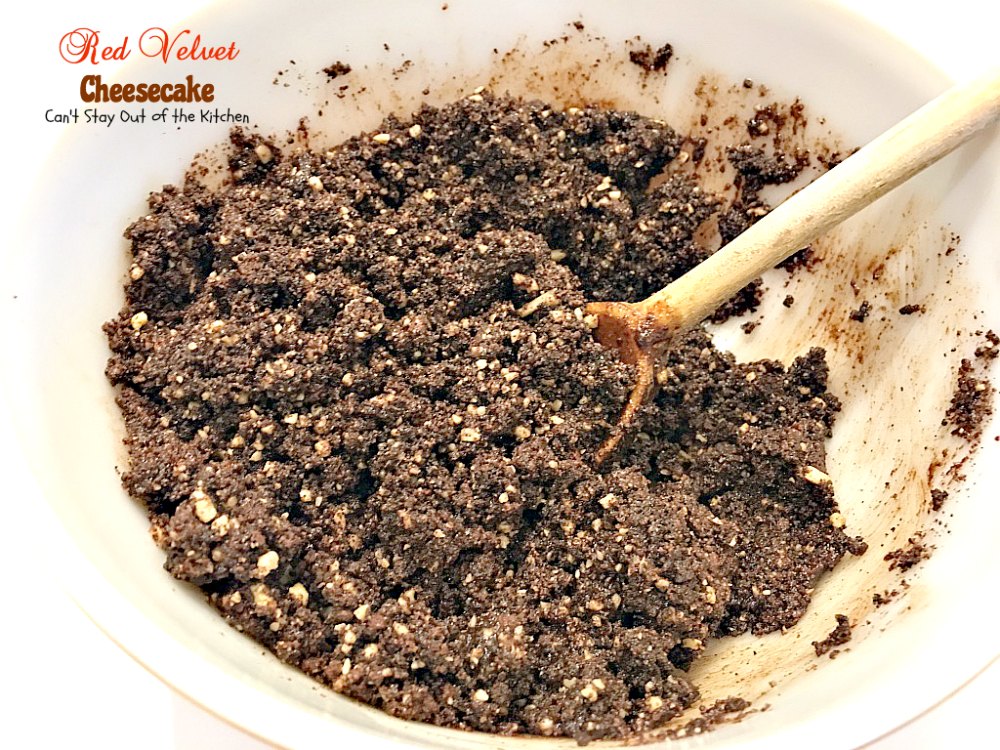
Melt butter. Add crushed Oreos filling that has been processed in your food processor. Stir all the ingredients together.
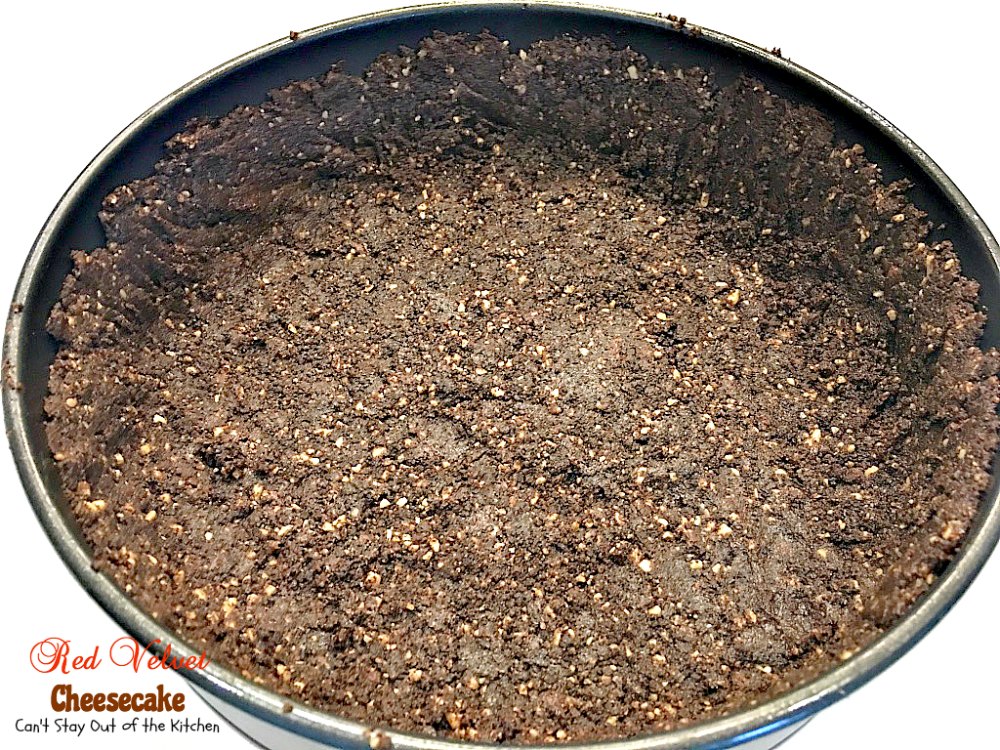
Spray a 10 x 13″ spring form pan with cooking spray. Press the crust ingredients all the way up the sides leaving a 1/2 inch border around the top. I found it easier to work with my hands rather than a fork.
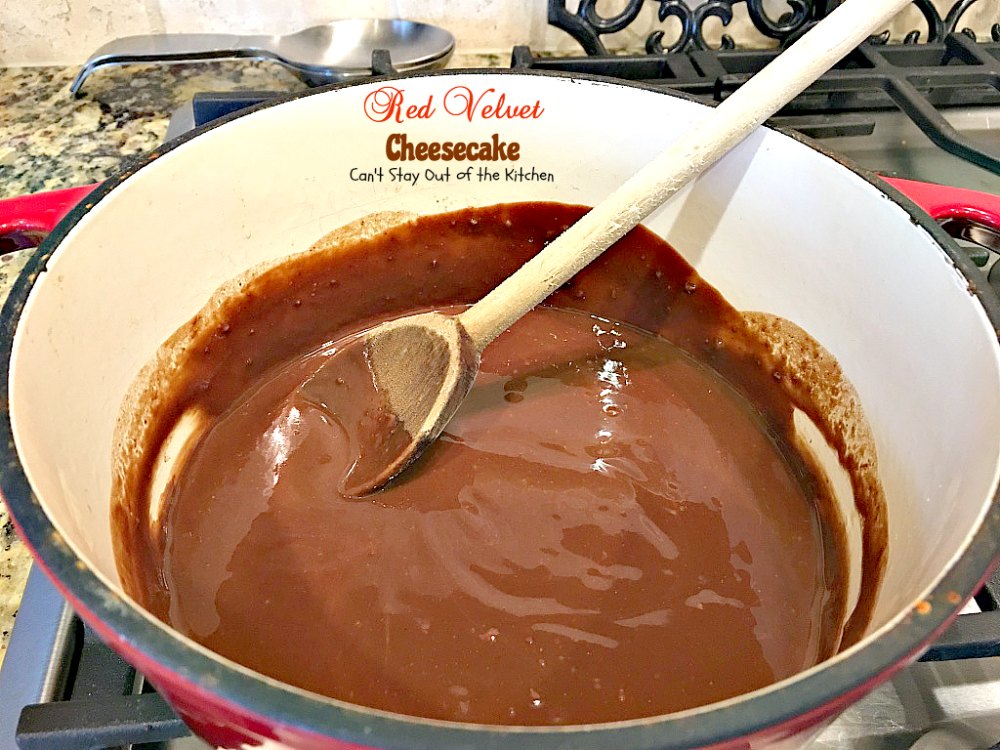
Melt the chocolate over low heat. Add a stick of butter to the chocolate and melt together. After the sauce has completely melted, set it aside to cool completely.
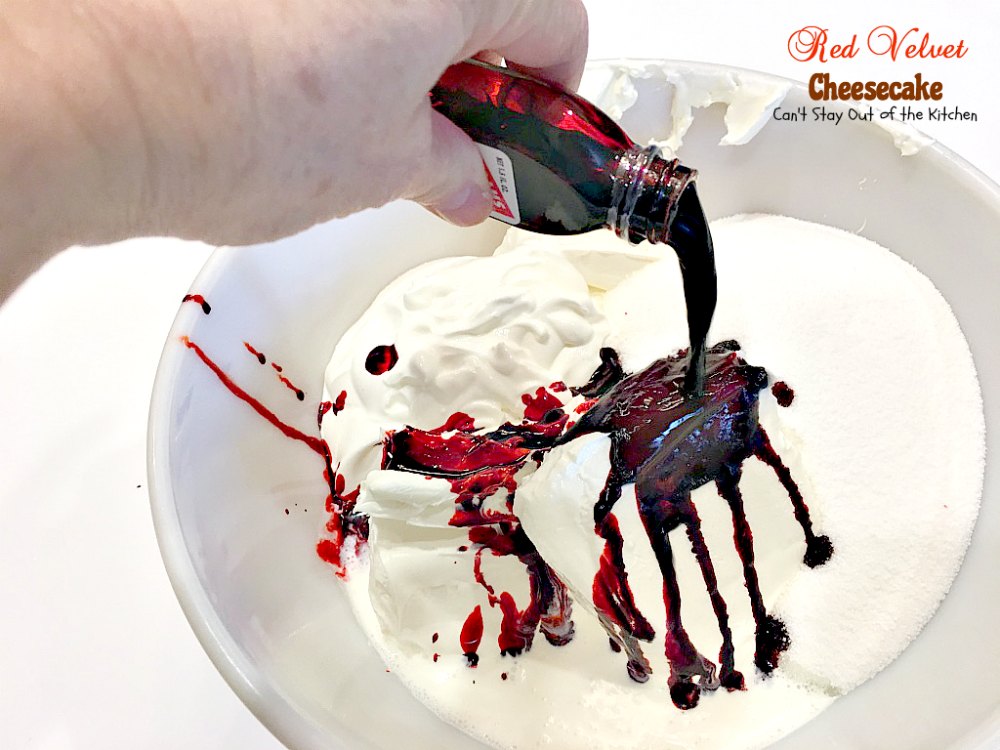
To make filling: Soften cream cheese in large mixer bowl. Add sour cream, sugar, heavy whipping cream and 1 1/2 ounces red food coloring.
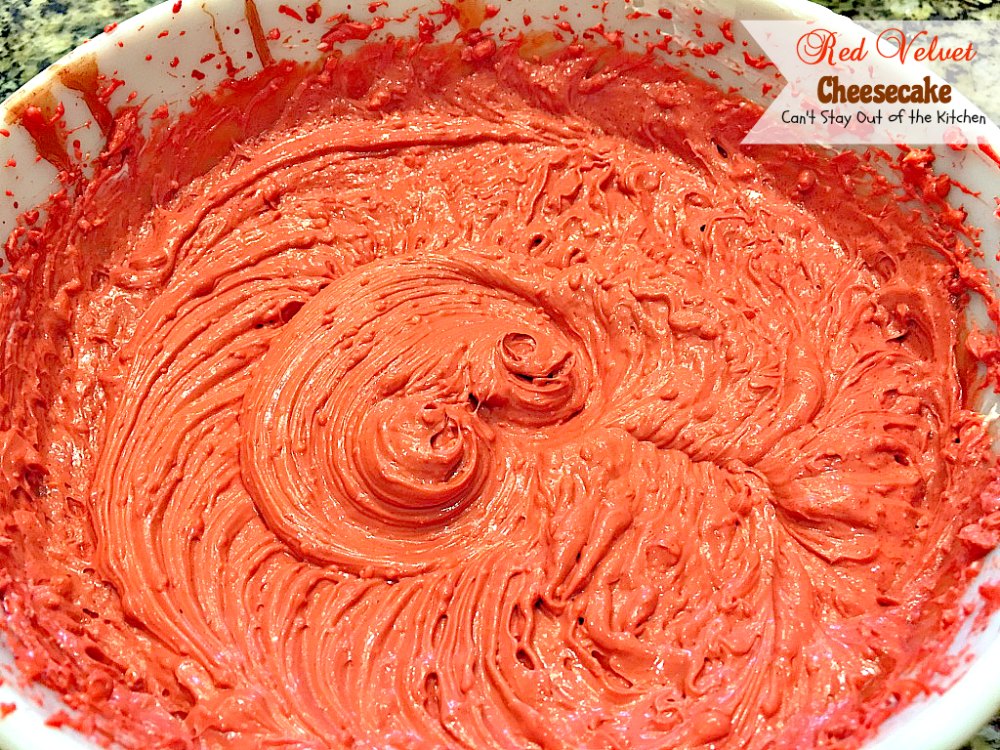
With an electric mixer, mix all ingredients until smooth.

Add cooled chocolate mixture.
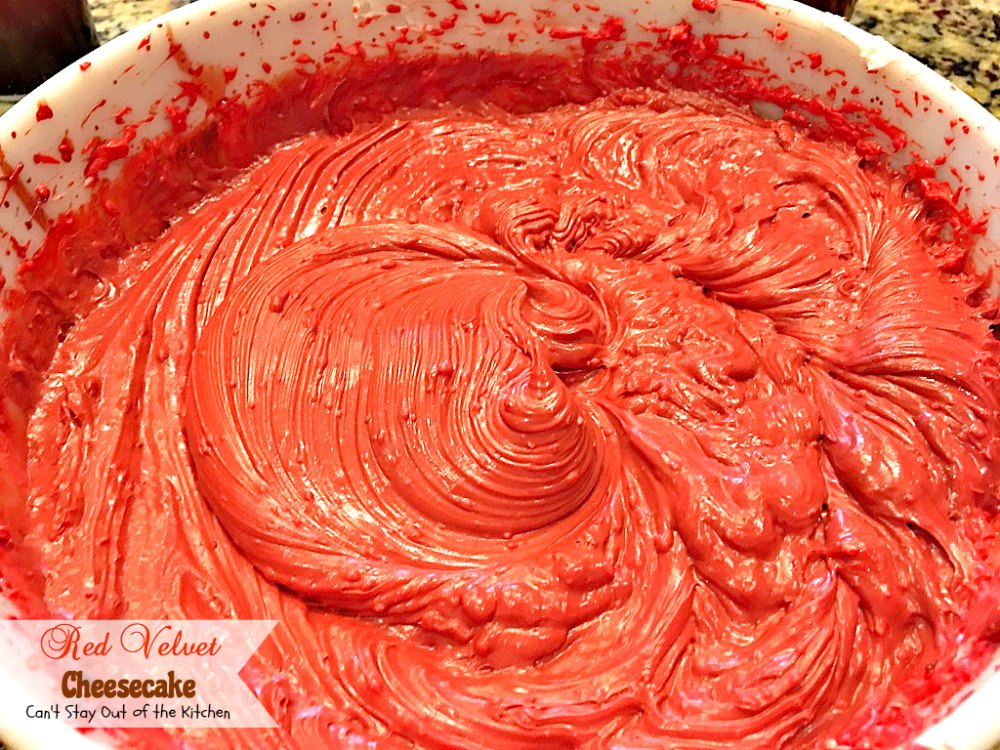
Mix again with an electric mixer until smooth.

Add eggs and egg yolks.
Mix ingredients again with an electric mixer.

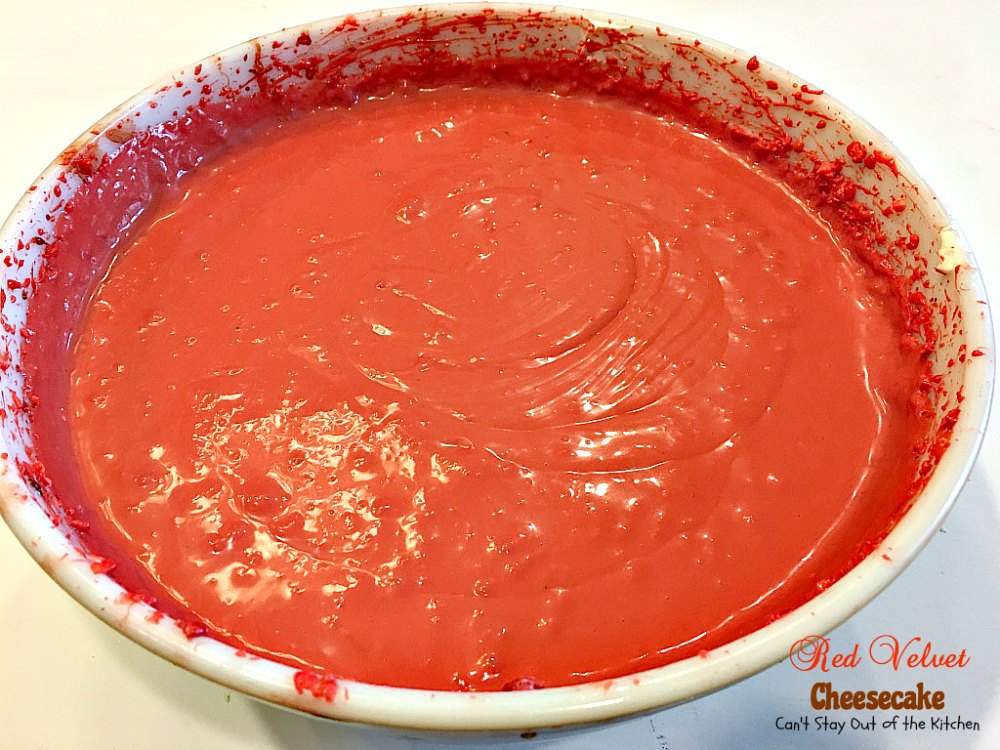
Pour the cream cheese batter into the chocolate crust and set the spring form pan into a shallow roasting pan.

Bake at 350 for 1 1/2 hours. The center of the pan may still be a little jiggly.
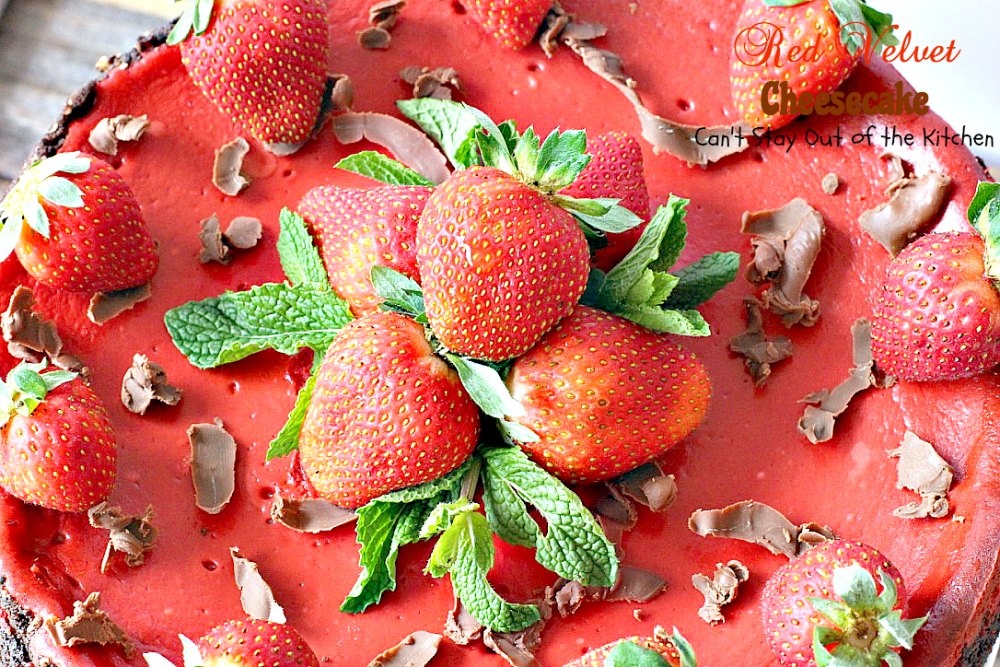
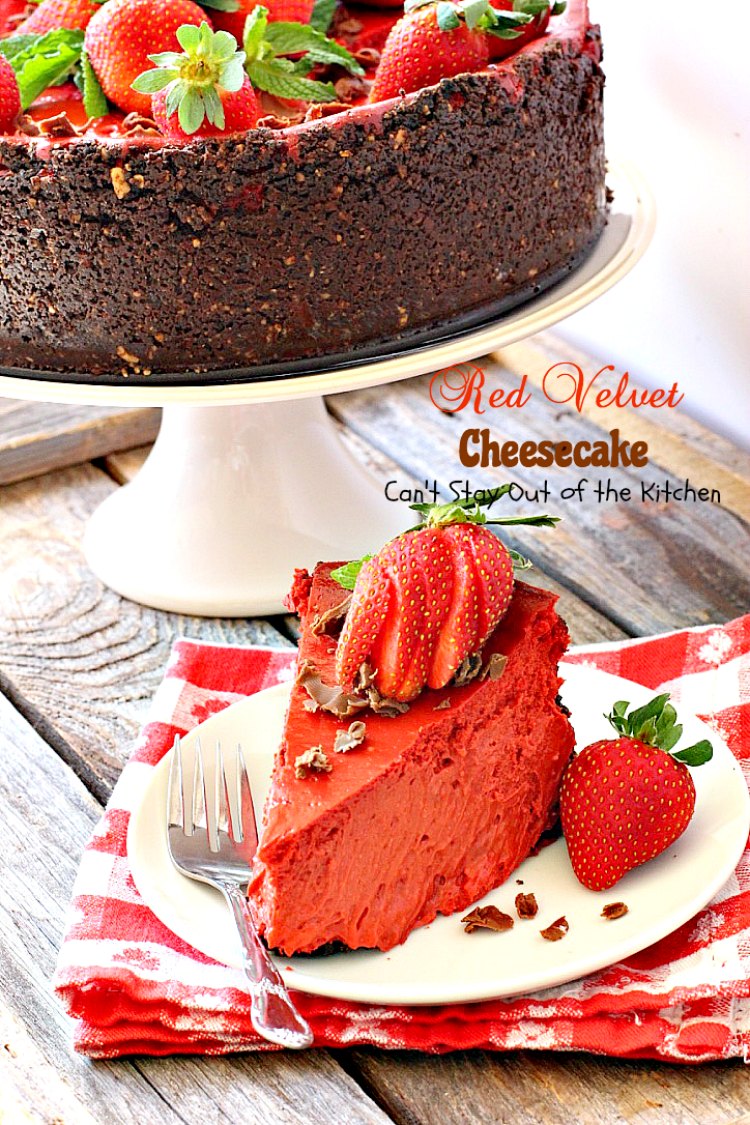
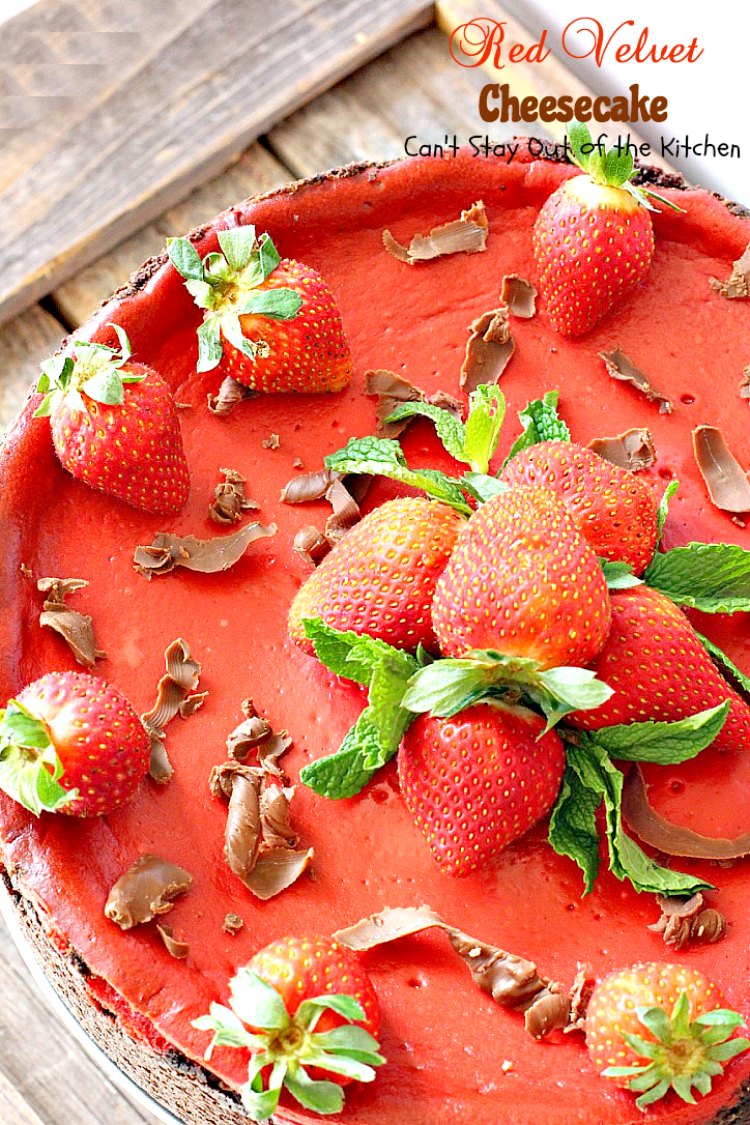
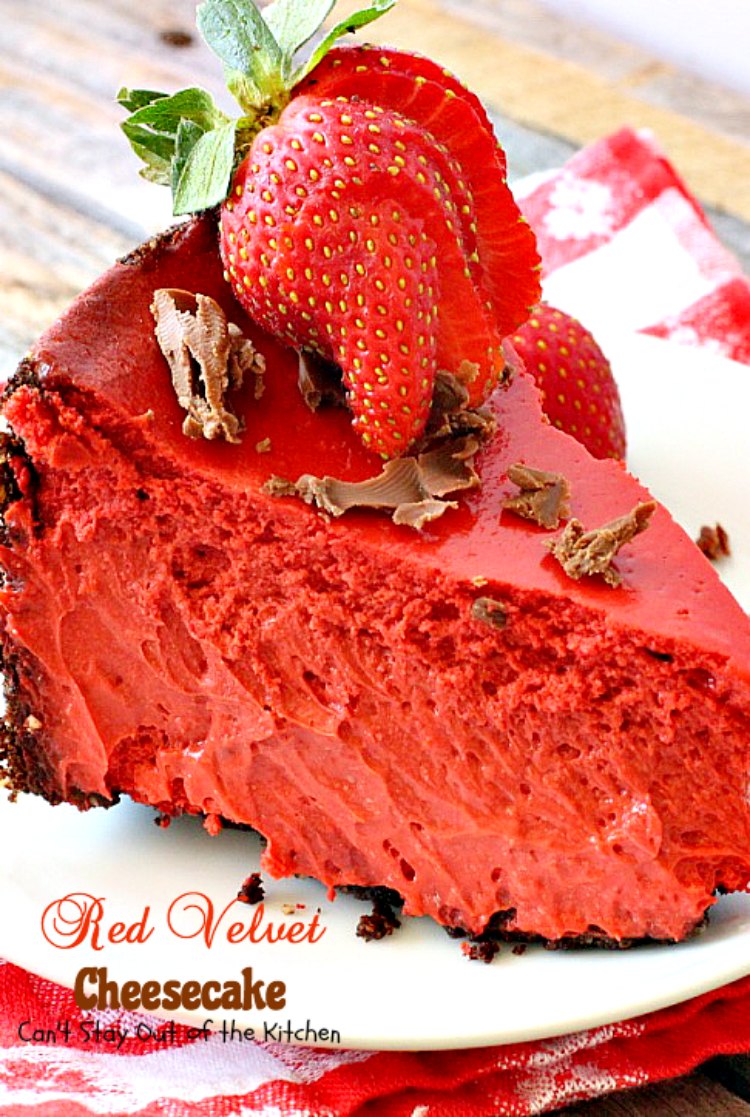
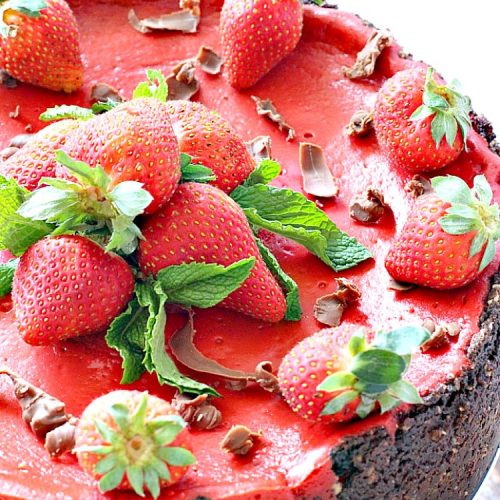
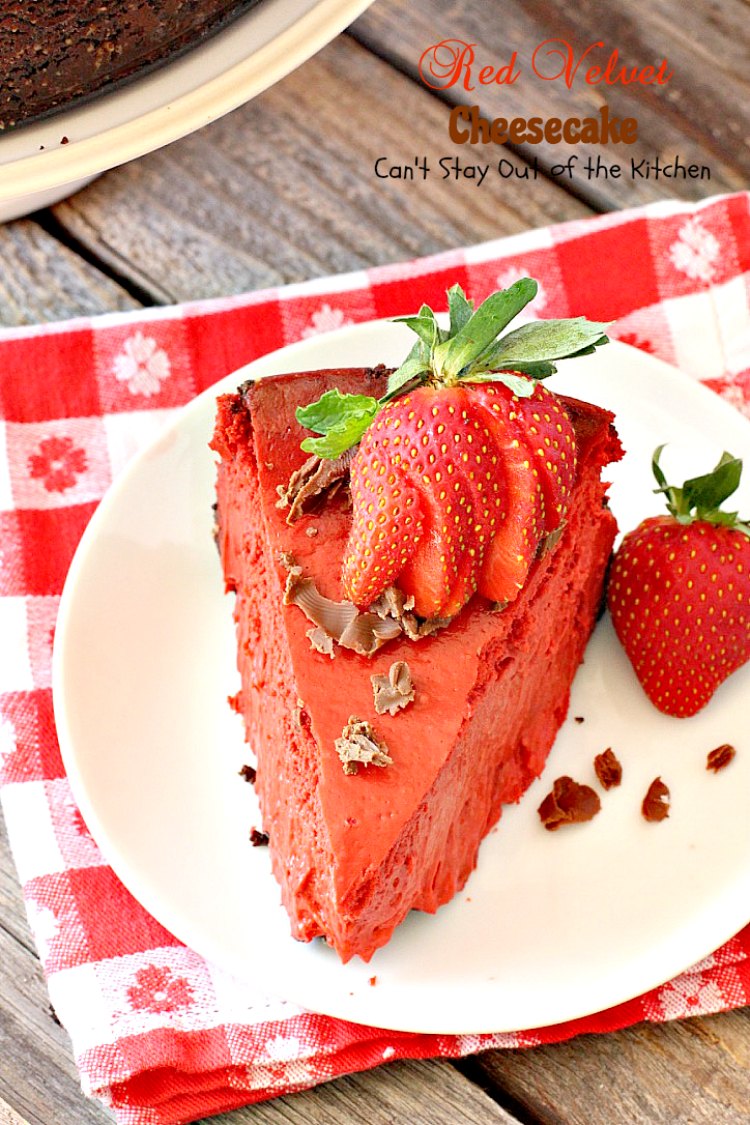
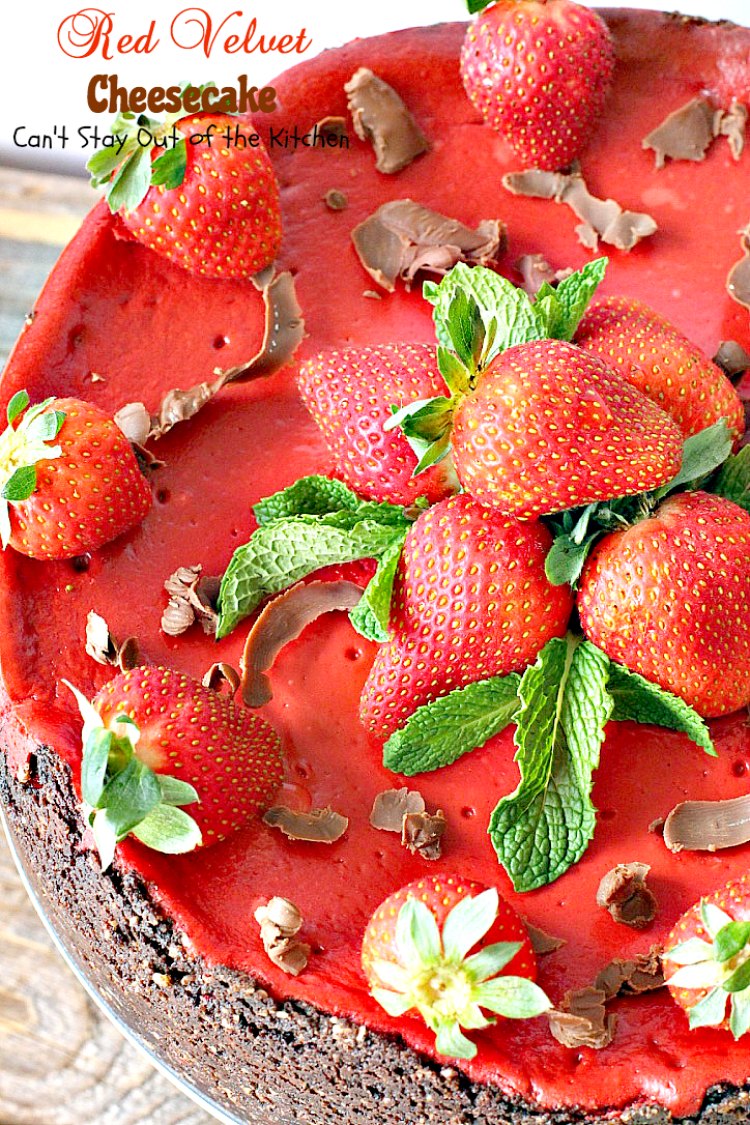
Place the Red Velvet Cheesecake on a plate or cake server. Garnish with chocolate curls and strawberries, as desired.

Red Velvet Cheesecake has a spectacular chocolate almond crust.
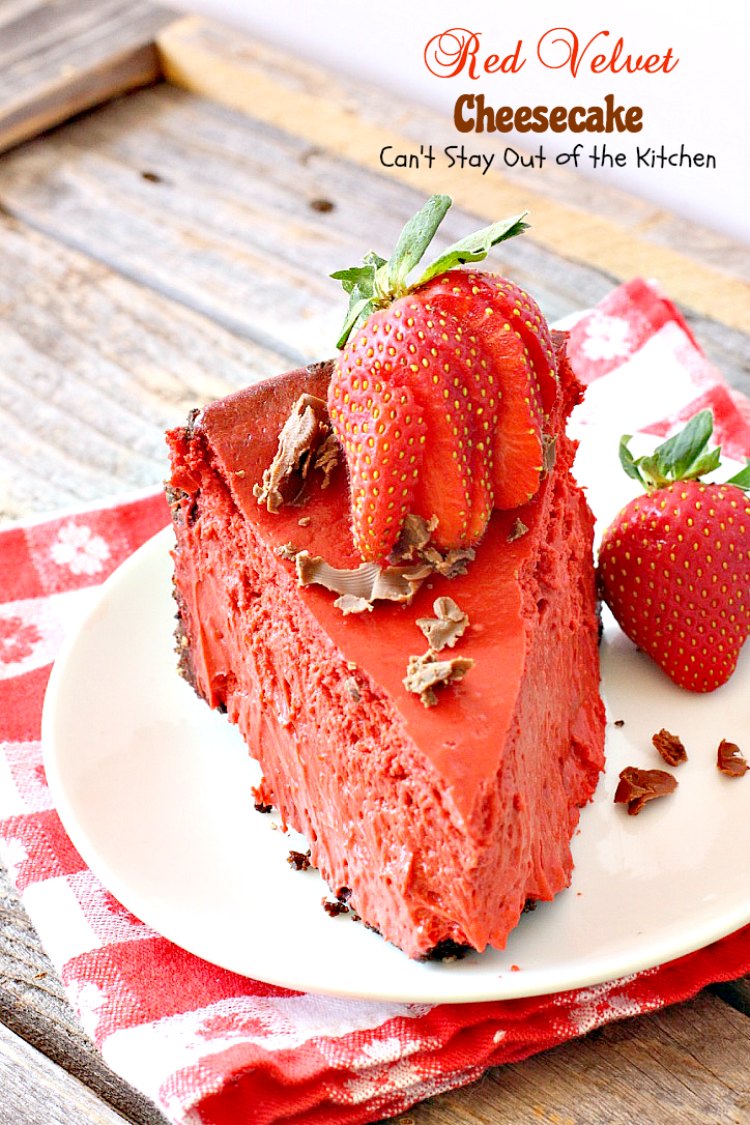
Serve individual portions of Red Velvet Cheesecake garnished with sliced strawberries and chocolate curls or chocolate syrup, if desired.

I loved this cheesecake and ate way more than my share of it!
Red Velvet Cheesecake is a spectacular dessert for Christmas, holiday baking, or Valentine’s Day.
Here’s the recipe.
RED VELVET CHEESECAKE
(Recipe inspired from Chobani Kitchens)
Red Velvet Cheesecake
Equipment
- 1 10x13" spring form pan
- 1 food processor
- 2 large mixing bowls
- measuring cups
- measuring spoons
- 1 Rolling Pin (if you don't have a heavy-duty food processor)
- 1 medium sauce pan
- 1 electric mixer
- 1 shallow baking pan to place the spring form pan into while baking
- 1 sharp knife to cut fruit
- 1 grater to grate chocolate curls, if desired
Ingredients
- 1/2 lb. Hershey's milk chocolate
- 1/2 cup unsalted butter
- 16 oz. pkg. Oreo-type cookies without the cream filling I used a 10-oz. thin stuffed Oreos
- 1 cup semi-sweet chocolate chips
- 1 cup almonds slivered or sliced
- 1/2 cup light brown sugar packed
- 1/2 cup unsalted butter melted
- 32 oz. pkg. cream cheese softened (4 blocks)
- 1 cup sour cream
- 1 1/2 cups granulated sugar
- 1/3 cup heavy whipping cream
- 1 1/2 oz. red food coloring
- 4 large eggs
- 2 large egg yolks
- 2 tbsp. Chocolate curls or chocolate sauce, for garnish
- 8 strawberries or raspberries, for garnish
Instructions
- For the crust: Process chocolate wafer cookies (oreos), (Minus the cream filling), chocolate chips, almonds, and brown sugar in a food processor until well combined.
- Place mixture in mixing bowl and add ½ cup melted butter.
- Stir to combine.
- If your food processor isn’t heavy duty you can crush the cookies with a rolling pin, and finely dice almonds and chocolate chips to get the same consistency.
- Press crumbs onto the bottom and sides of a 10x13 spring form pan, leaving a ½ inch space at the top of the pan.
- Set aside.
- For the filling: In a saucepan, melt milk chocolate and ½ cup butter over low heat.
- Transfer to a bowl and cool completely.
- Soften cream cheese.
- Add sour cream, granulated sugar, heavy whipping cream, red food coloring, and cooled chocolate mixture.
- Beat with an electric mixer until combined.
- Add eggs and egg yolks and mix until combined.
- Pour filling into crust.
- Place spring form pan on a shallow baking pan.
- Bake cheesecake at 350° about 1 1/2 hours until outsides are done but the middle may still be very slightly jiggly.
- Cool cheesecake in spring form pan on a wire rack for 15 minutes.
- Use a small, metal spatula to loosen cheesecake from sides of pan and cool 30 minutes more.
- Remove sides of pan, cool for 1 hour more.
- Cover and chill at least 4 hours.
- Garnish with chocolate curls and strawberries.
- When serving, add chocolate syrup over individual servings, if desired.
Notes
Recipe inspired from Chobani Kitchens.
© Can’t Stay Out of the Kitchen
Nutrition
- ½ lb. milk chocolate, chopped
- ½ cup butter
- 16-oz. Oreo-type cookies without the cream filling or other chocolate wafer cookie
- 1 cup semisweet chocolate chips
- 1 cup slivered or sliced almonds
- ½ cup brown sugar
- ½ cup butter, melted
- 4 8-oz. pkg. cream cheese, softened
- 1 cup vanilla or plain [url href=”http://www.chobani.com/culture/recipes/red-velvet-cheesecake/” target=”_blank” title=”chobani red velvet cheesecake”]Chobani [/url]Greek yogurt
- 1 cup sugar
- 1/3 cup buttermilk
- 1 ½-oz. red food coloring
- 4 eggs
- 2 egg yolks
- Chocolate shavings, powdered sugar, cocoa powder, fresh raspberries or strawberries for garnish
- [b]For the crust: [/b][br]
- Process chocolate wafer cookies (oreos), chocolate chips, almonds, and brown sugar in a food processor until well combined.
- Place mixture in mixing bowl and add ½ cup melted butter.
- Stir to combine.
- If your food processor isn’t heavy duty you can crush the cookies with a rolling pin, and finely dice almonds and chocolate chips to get the same consistency.
- Press crumbs onto the bottom and sides of a 10×13 spring form pan, leaving a ½ inch space at the top of the pan.
- Set aside.
- [b]For the filling:[/b] [br]
- In a saucepan, melt milk chocolate and ½ cup butter over low heat.
- Transfer to a bowl and cool completely.
- Soften cream cheese.
- Add Greek yogurt, sugar, buttermilk, red food coloring, and cooled chocolate mixture.
- Beat with an electric mixer until combined.
- Add eggs and egg yolks and mix until combined.
- Pour filling into crust.
- Place spring form pan on a shallow baking pan.
- Bake cheesecake at 350° until 2 inches of outside edge appear set when shaken gently, about 1 hour.
- Cool cheesecake in spring form pan on a wire rack for 15 minutes.
- Use a small, metal spatula to loosen cheesecake from sides of pan and cool 30 minutes more.
- Remove sides of pan, cool for 1 hour more.
- Cover and chill at least 4 hours.
- Sprinkle with powdered sugar or cocoa powder.
- Add chocolate shavings.
- Add fresh raspberries or strawberries just before serving.
- Serve with chocolate sauce, if desired.

Red Velvet Cheesecake is sumptuous. Please your guests with this lovely cheesecake.
Your company will love digging in to this marvelous cheesecake. I tell you, they will have a hard time not going back for seconds!
Red Velvet Cheesecake is so delectable. I loved the creamy texture.
I served Red Velvet Cheesecake with chocolate curls, but you can use chocolate sauce if you prefer.

Make this delicious cheesecake for your sweetie on Valentine’s Day, Christmas, anniversary, birthday or any special occasion. Yum, yum.
You may also enjoy these delicious recipes!

Red Velvet Cheesecake
Equipment
- 1 10×13" spring form pan
- 1 food processor
- 2 large mixing bowls
- measuring cups
- measuring spoons
- 1 Rolling Pin (if you don't have a heavy-duty food processor)
- 1 medium sauce pan
- 1 electric mixer
- 1 shallow baking pan to place the spring form pan into while baking
- 1 sharp knife to cut fruit
- 1 grater to grate chocolate curls, if desired
Ingredients
- 1/2 lb. Hershey’s milk chocolate
- 1/2 cup unsalted butter
- 16 oz. pkg. Oreo-type cookies without the cream filling I used a 10-oz. thin stuffed Oreos
- 1 cup semi-sweet chocolate chips
- 1 cup almonds slivered or sliced
- 1/2 cup light brown sugar packed
- 1/2 cup unsalted butter melted
- 32 oz. pkg. cream cheese softened (4 blocks)
- 1 cup sour cream
- 1 1/2 cups granulated sugar
- 1/3 cup heavy whipping cream
- 1 1/2 oz. red food coloring
- 4 large eggs
- 2 large egg yolks
- 2 tbsp. Chocolate curls or chocolate sauce, for garnish
- 8 strawberries or raspberries, for garnish
Instructions
- For the crust: Process chocolate wafer cookies (oreos), (Minus the cream filling), chocolate chips, almonds, and brown sugar in a food processor until well combined.
- Place mixture in mixing bowl and add ½ cup melted butter.
- Stir to combine.
- If your food processor isn’t heavy duty you can crush the cookies with a rolling pin, and finely dice almonds and chocolate chips to get the same consistency.
- Press crumbs onto the bottom and sides of a 10×13 spring form pan, leaving a ½ inch space at the top of the pan.
- Set aside.
- For the filling: In a saucepan, melt milk chocolate and ½ cup butter over low heat.
- Transfer to a bowl and cool completely.
- Soften cream cheese.
- Add sour cream, granulated sugar, heavy whipping cream, red food coloring, and cooled chocolate mixture.
- Beat with an electric mixer until combined.
- Add eggs and egg yolks and mix until combined.
- Pour filling into crust.
- Place spring form pan on a shallow baking pan.
- Bake cheesecake at 350° about 1 1/2 hours until outsides are done but the middle may still be very slightly jiggly.
- Cool cheesecake in spring form pan on a wire rack for 15 minutes.
- Use a small, metal spatula to loosen cheesecake from sides of pan and cool 30 minutes more.
- Remove sides of pan, cool for 1 hour more.
- Cover and chill at least 4 hours.
- Garnish with chocolate curls and strawberries.
- When serving, add chocolate syrup over individual servings, if desired.